


In a multi-monitor setup, efficiently moving windows from one screen to another is a valuable skill. Whether you’re working with multiple applications or need to rearrange your workspace, Windows provides user-friendly methods for seamless window relocation.
I. Utilizing Keyboard Shortcuts for Quick Moves
1.1 Pressing Windows Key + Shift + Arrow Keys
When looking for a swift solution, keyboard shortcuts are your go-to option. Firstly, press the Windows key along with Shift and an arrow key (left or right) to move the active window to the adjacent screen.
1.2 Applying Windows Key + Shift + Left/Right (Twice)
To take it a step further, you can also press the Windows key, Shift, and the left or right arrow key twice consecutively. This action not only moves the window but also maximizes or restores it on the destination screen.
II. Using the Mouse for Precision Moves
2.1 Dragging the Window to the Screen Edge
For those who prefer mouse interactions, firstly, click and hold the window’s title bar. Next, drag it to the edge of the current screen in the direction of the desired screen. The window will smoothly transition to the adjacent display.
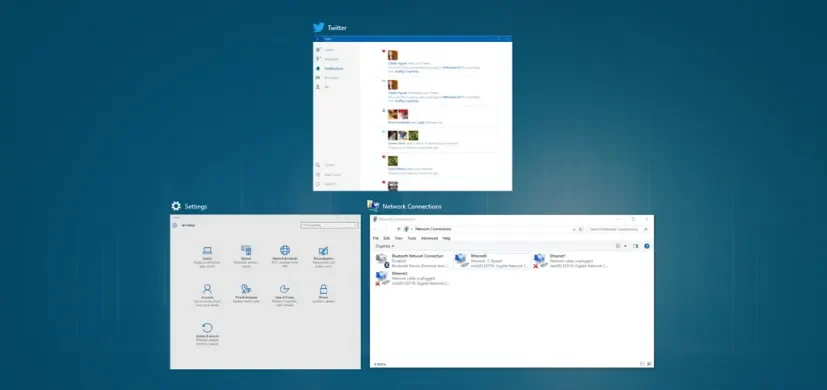
2.2 Right-Click on Taskbar Icon and Select Move to
Alternatively, right-click on the application’s icon in the taskbar. If the application is already open, right-click on its taskbar icon. Next, hover over ‘Move to’ and select the desired screen. This method is especially useful when dealing with minimized windows.
III. Leveraging Window Management Features
3.1 Snapping Windows to the Desired Screen
Windows operating system introduces a feature that allows snapping windows to the sides of screens. Firstly, drag the window to the screen’s edge, and it will automatically snap to fill half of the display. This technique provides quick and efficient utilization of available screen real estate.

3.2 Using Task View for Multi-Screen Arrangement
Task View, accessible through the Taskbar or by pressing Windows key + Tab, is an advanced tool for multi-screen organization. Firstly, enter Task View, and then drag and drop windows to the desired screen for a seamless and organized workspace.
Conclusion
In conclusion, mastering the art of moving windows between screens enhances productivity and optimizes your workflow. Whether you prefer keyboard shortcuts, mouse interactions, or advanced window management features, Windows offers versatile options for a personalized and efficient multi-monitor experience.
Frequently Asked Questions – Moving Windows to Another Screen in Windows:
Q1: How can I quickly move an active window to another screen using keyboard shortcuts?
- A1: Press the Windows key, Shift, and the arrow key (left or right) simultaneously to move the window to the adjacent screen. Alternatively, press Windows key + Shift + left/right arrow key twice for additional features.
Q2: Is there a mouse-based method for moving windows between screens?
- A2: Yes, you can click and hold the window’s title bar, drag it to the edge of the current screen in the direction of the desired screen, and release. Alternatively, right-click on the taskbar icon and select ‘Move to.’
Q3: How does window snapping contribute to efficient multi-screen usage?
- A3: Drag the window to the edge of a screen, and it will automatically snap to fill half of the display. This feature streamlines window organization, allowing quick utilization of screen real estate.
Q4: Can I use Task View for more advanced multi-screen window arrangement?
- A4: Absolutely. Access Task View through the Taskbar or Windows key + Tab. Drag and drop windows to different screens for an organized and efficient multi-monitor workspace.
Q5: Are there other window management features to explore on Windows?
- A5: Yes, explore the ‘Move to’ option by right-clicking on an open application’s taskbar icon. Additionally, use Task View for a comprehensive overview of open windows across multiple screens.
Q6: What benefits does mastering window relocation bring to my workflow?
- A6: Mastering window relocation optimizes your workspace, enhances productivity, and allows for a more seamless and organized multi-monitor experience.
Q7: Can I use these techniques on various Windows versions, including Windows 10 and Windows 11?
- A7: Yes, the described techniques are applicable to both Windows 10 and Windows 11, offering versatile options for users with multiple monitors.
Q8: Are there specific scenarios where these window-moving techniques prove especially useful?
- A8: These techniques are beneficial when working with multiple applications simultaneously, rearranging your workspace, or enhancing overall workflow efficiency.