


Losing important files on your Mac can be a frustrating experience, especially when those files seem to vanish without a trace. Whether it’s a critical work document, cherished photos, or essential project files, the panic that sets in when data disappears is universal. Fortunately, macOS offers multiple ways to recover deleted files, and understanding these methods can save you hours—or even days—of stress.
This guide will walk you through everything you need to know about how to recover deleted files on Mac. From the basics of how file deletion works on macOS to advanced recovery techniques, we’ll cover practical, step-by-step instructions and provide expert tips to maximize your chances of success. Whether you’re a beginner or a tech-savvy user, this comprehensive resource will help you restore your lost data safely and efficiently.
How Deleted Files Are Handled on Mac
Before diving into recovery methods, it’s crucial to understand what happens when you delete a file on a Mac. Unlike simply erasing data, macOS uses a multi-layered system to manage deleted files, which affects how and whether you can recover them.
Trash Bin Explained

When you delete a file on your Mac, it’s not immediately removed from your storage device. Instead, it is moved to the Trash (similar to the Recycle Bin on Windows). Files remain in the Trash until you manually empty it or until macOS automatically empties it after a set period (usually 30 days if using certain settings).
– Restoring from Trash: You can easily restore files by opening the Trash, right-clicking the file, and selecting Put Back. This returns the file to its original location.
– Emptying Trash: Once emptied, the files are marked as deleted, and their storage space is marked as available for overwriting, making recovery more difficult.
Role of Time Machine and iCloud Backups

macOS provides robust backup options that act as safety nets for deleted files:
– Time Machine: This built-in backup utility automatically saves snapshots of your entire system, including files and folders. You can browse these backups and restore deleted files even if they’re no longer in the Trash.
– iCloud Drive: If you use iCloud Drive, deleted files may be recoverable from the Recently Deleted folder within iCloud for up to 30 days. iCloud syncs your files across devices, offering another layer of protection.
Impact of APFS and HFS+ File Systems on Recovery
macOS uses two primary file systems:
– HFS+ (Hierarchical File System Plus): Older Macs and macOS versions use HFS+. It stores files in a traditional directory structure and allows for relatively straightforward recovery of deleted files if the data hasn’t been overwritten.
– APFS (Apple File System): Introduced in macOS High Sierra, APFS is optimized for SSDs and includes features like snapshots and cloning. While APFS improves performance and reliability, its handling of deleted files—especially with SSDs and TRIM enabled—can make recovery trickier.
Understanding which file system your Mac uses can influence your recovery options and success rate。
Step-by-Step Methods to Recover Deleted Files on Mac
Here are the most effective techniques to recover deleted files, detailed with clear instructions for users of all levels.
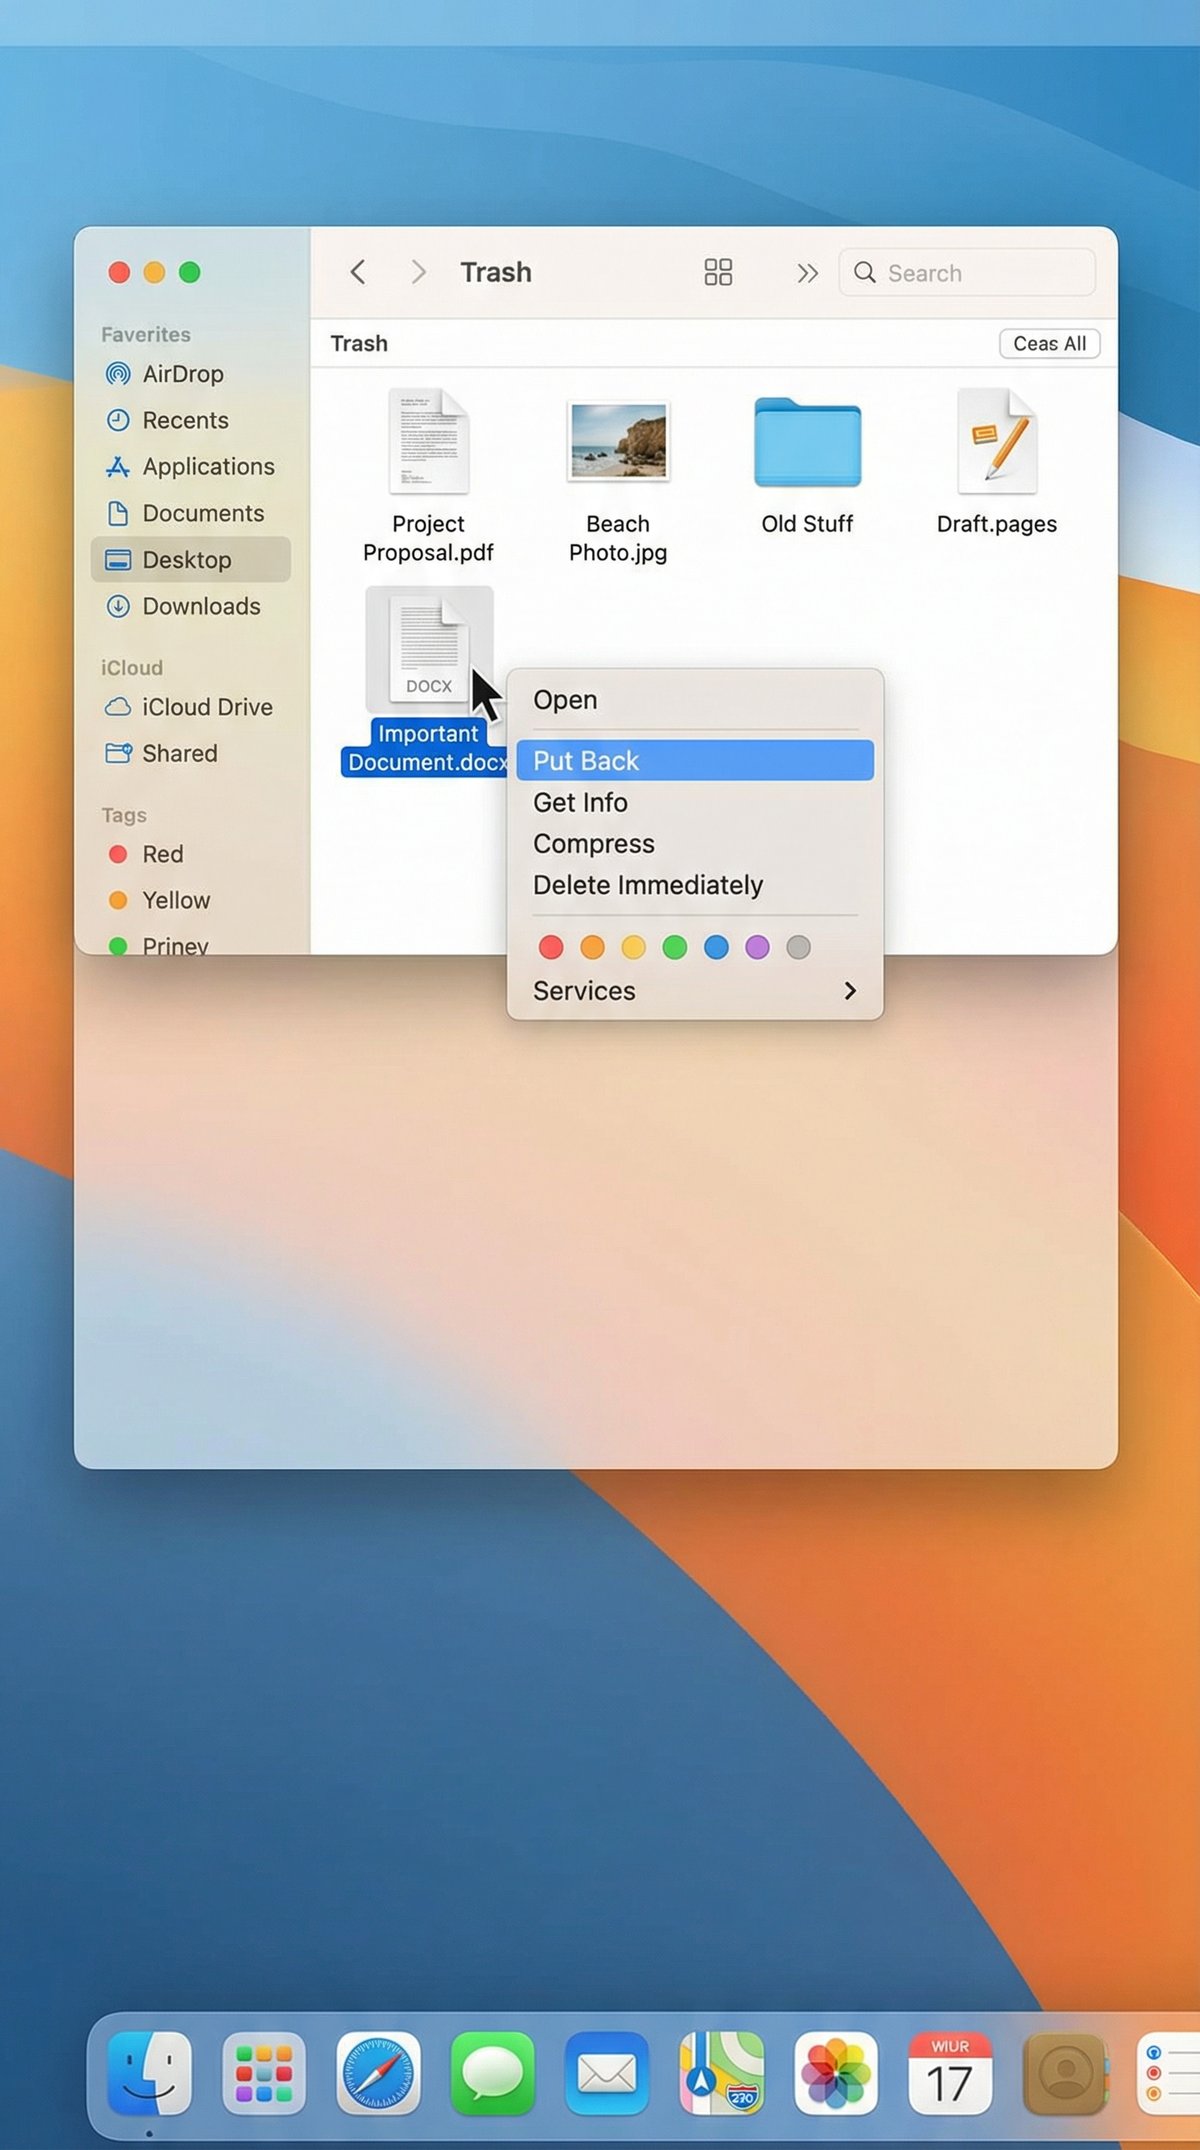
Method 1: Recover from Trash Bin
1. Open the Trash: Click the Trash icon in your Dock.
2. Locate the deleted file: Browse or search for the file you want to recover.
3. Restore the file: Right-click the file and select Put Back. The file will return to its original folder.
4. If Trash is empty: Unfortunately, once emptied, files aren’t accessible here, so proceed to other recovery methods.
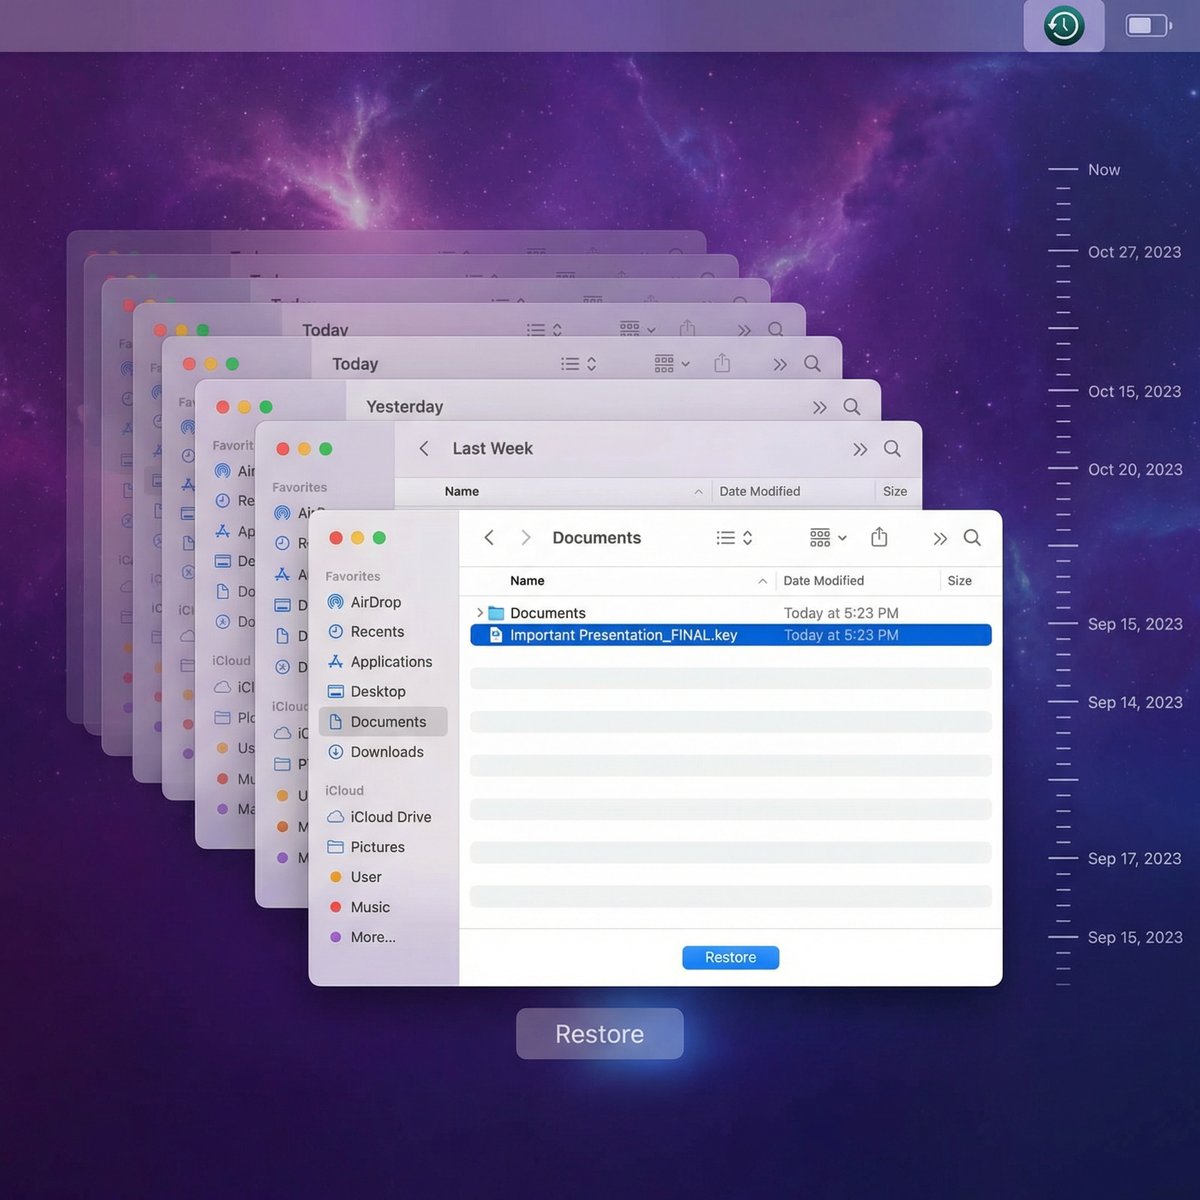
Method 2: Restore Using Time Machine Backup
1. Connect your Time Machine drive: Ensure your backup disk is connected and powered on.
2. Open the folder: Navigate to the folder where the deleted file was located.
3. Launch Time Machine: Click the Time Machine icon in the menu bar and select Enter Time Machine.
4. Browse backups: Use the timeline on the right to find a backup before the file was deleted.
5. Select and restore: Highlight the file and click Restore. The file will be copied back to its original location.
Method 3: Retrieve Files from iCloud Drive
#### Via Finder
1. Open Finder and click iCloud Drive in the sidebar.
2. Check the Recently Deleted folder: Scroll down and look for the Recently Deleted folder.
3. Restore files: Select the files and click Recover.
#### Via iCloud Web
1. Visit [icloud.com](https://www.icloud.com) and log in with your Apple ID.
2. Click iCloud Drive.
3. Click the gear icon and select Recently Deleted.
4. Select the files and click Recover.
Method 4: Use Terminal Commands for Recovery
For advanced users, Terminal offers commands that can sometimes help locate or recover files:
– List deleted files (if not overwritten):
“`bash
sudo lsof | grep deleted
“`
– Use `fsck` for file system check:
“`bash
sudo fsck_apfs -y /dev/diskXsY
“`
*Replace `diskXsY` with your disk identifier.*
Warning: Terminal commands can cause data loss if misused. Always back up your current data before proceeding.
Method 5: Employ Third-Party Data Recovery Software
When built-in methods fail, third-party software can scan your drive for recoverable data.
Steps to use recovery software:
1. Choose trusted software (see next section).
2. Download and install on a different drive (to avoid overwriting deleted files).
3. Run a deep scan of your Mac’s drive.
4. Preview and select files you wish to recover.
5. Restore files to a different location to prevent overwriting.
Choosing the Right Data Recovery Software for Mac
Selecting the right tool is essential for a successful recovery. Here’s a comparison of some popular Mac recovery software:
Comparison Table of Top Tools
Comparison Table of Top Tools
| Software | Features | Pricing | Ease of Use | Pros | Cons |
| PhotoRec | | Open-source, supports many formats | Free | Command-line | Free and powerful | No GUI, less intuitive |
| Disk Drill | Deep scan, preview, multiple file types | Free trial; Pro $89 | User-friendly | Intuitive UI, reliable recovery | Limited free recovery |
| Data Rescue 6 | Extensive scanning, file preview | $99 | Moderate | owerful scanning algorithms | Higher cost |
| EaseUS Data Recovery Wizard | Quick scan, supports APFS & HFS+ | Free 2GB; Pro $89.95 | Very user-friendly | Fast scanning, good support | Free version limited |
| Stellar Data Recovery | Supports many file types, Time Machine recovery | Free 1GB; Pro $79.99 | Easy to use | Good for Time Machine recovery | Can be slow on large drives |
How to Safely Use Recovery Software
– Install on a different drive or external disk to avoid overwriting deleted files.
– Run scans without saving recovered files to the same drive.
– Avoid using your Mac extensively before recovery to minimize data overwriting.
– Download software only from official sources to avoid malware.
– Back up recovered files immediately after recovery.
Understanding SSDs, TRIM, and Their Effect on File Recovery
Many modern Macs use SSDs (Solid State Drives), which handle deleted files differently than traditional hard drives.
– TRIM is a command that helps SSDs manage unused data blocks efficiently by erasing deleted data quickly.
– This means once a file is deleted on an SSD with TRIM enabled, the actual data might be wiped almost immediately, reducing recovery chances.
– Checking TRIM status:
“`bash
system_profiler SPSerialATADataType | grep ‘TRIM’
“`
– Mitigation: If you anticipate needing recovery, avoid heavy use of your Mac after deletion, and consider disabling TRIM temporarily (not generally recommended due to performance impacts).
Troubleshooting Common Recovery Issues
What to Do If Files Are Not Recoverable
– Professional data recovery services: If software fails, specialized labs can sometimes retrieve data from damaged or overwritten drives.
– Preventive measures: Regular backups and cautious file management minimize risk.
– Accepting loss: Sometimes files are permanently lost; focus on prevention going forward.
Handling Corrupted Files
– Identify corruption: Files that won’t open or show errors may be corrupted.
– Repair tools: Use software like Disk Utility for disk repair or dedicated file repair tools (e.g., for documents or images).
– Restore from backup: If repair fails, revert to a backup copy.
Best Practices to Prevent Data Loss on Mac
Prevention is always better than cure. Here are top tips to avoid losing files:
Regular Backup Strategies
– Time Machine: Set up automatic backups to an external drive.
– iCloud Drive: Use for syncing and backup of important documents.
– Third-party cloud services: Dropbox, Google Drive, or OneDrive offer additional backup layers.
– Manual backups: Periodically copy critical files to external drives or NAS.
Tips to Avoid Accidental Deletion
– Organize files into clearly labeled folders.
– Use Finder’s “Get Info” to check file permissions.
– Enable confirmation prompts for deleting files.
– Use versioning in apps like Pages or Microsoft Office to keep previous versions.
– Set up Time Machine to ensure you have recent snapshots.
Security and Privacy Considerations When Recovering Files
Recovering deleted files, especially with third-party tools, can expose sensitive data.
– Use reputable software from trusted developers.
– Read privacy policies regarding data handling.
– Avoid installing software from unknown sources.
– Run antivirus scans before and after recovery.
– Disconnect from the internet during recovery to prevent unauthorized access.
– Securely delete recovered files if they contain sensitive information.
Conclusion
Recovering deleted files on a Mac is often possible if you act quickly and use the right tools. From restoring files in the Trash and leveraging Time Machine or iCloud backups to employing Terminal commands and third-party recovery software, this guide has covered the most effective methods for file recovery.
Remember, understanding how macOS handles deletion, the impact of file systems and SSDs, and adopting strong backup habits are your best defenses against data loss. By following the step-by-step instructions and best practices outlined here, you’ll be well-equipped to recover lost files and protect your data moving forward.
Stay proactive, back up regularly, and keep this guide handy—you never know when you might need to recover deleted files on your Mac.